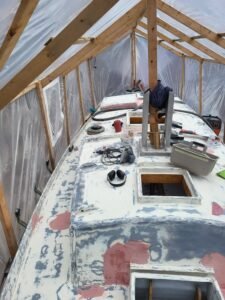
And if I haven’t had time to update this blog lately, dear Reader: be comforted! It’s because I’ve been so busy doing things to blog about now. You remember the fairing that was going on in the last blog post; you’ll be glad to hear that by now it’s mostly done, by dint of chipping away at the project all winter as time and weather allowed.

It’s soul-wearying work, especially as every time you’re just having a last go with the sander before primer a new spot to fix will turn up, but at last we sloshed on a coat of Awlgrip 545 primer. As much as I love Kirby’s one-part primers and topside enamels, I find that the durability of the Awlgrip paint system amortizes the cost enough to make it worthwhile, and only having to refresh it once a decade makes you forget how finicky it was to apply when you were tearing your hair out at every speck of dust that ruined your perfect finish.
But all of life isn’t sanding and painting: the interior project is happening as well. Once the cabin sole was done, it looked so nice Danielle had me do the sole in the head to match as well. It was as well that I was redesigning the settee, since the interface between the new settee edge and the head sole would have been awkward otherwise. As it turns out, it all flows nicely into the more modern look of Ganymede’s re-designed interior.
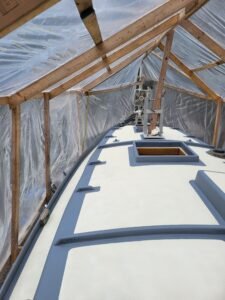
To roll and tip Awlgrip paint is a skill hard to learn and easy to forget, so I’ve been practicing by painting smaller things: the hatch lids, bowsprit, channels, and transom. With my technique properly honed, I’ll be ready for the deck and house when that time comes. In the meantime, we smear more Awlfair over the primer, and sand most of both off, all the while chanting the mantra: “Believe in the method; believe in the method.” And here I have to put in a plug for Festool sanding systems: if you’re going to buy really expensive paints and compounds to reduce to dust, the least you can do is buy really expensive vacuum bags to put the dust into. As discouraging as all that sounds, the Festool vacuum sander, especially given the toxic nature of the coatings, is a monumental improvement over a lesser vacuum with the hose duct-taped to a lesser sander. To sand essentially dust-free is priceless, and good vacuum bags are an investment well worthwhile. It’s all part of the method.
In a departure from convention we could not have dreamed of while living aboard, we decided to eliminate the salon table. Even though it was the centerpiece of the cabin, where all our meals were eaten and all our games played, it was dreadfully in the way of anyone who needed to pass by someone cooking, and with the settee moving further into the cabin, it would have had to be so reduced in size as to be hardly worth the room the legs took up.
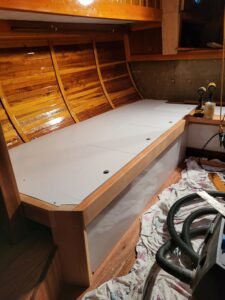
Instead, we’ll have the salon as a lounge, with deeper seats and more comfortable backs, and figure out a temporary table that can be stowed when not being actively used. Now, while I managed to re-purpose a lot of the original wood from the settee framing and trim, I had to come up with something better for the settee backs. We had at first had cushions that covered the painted locker doors behind, but over time the cushions were discarded as impractical and in the way, leaving the painted panels showing. This time I wanted something better to look at, so I took a load of tongue-and-groove doug fir that I salvaged several years ago off an antique wrecked boat and cut them down into panel faces.
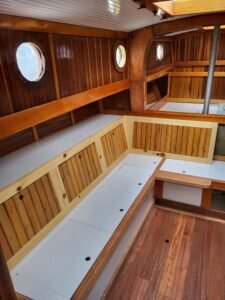
It was a lot more work than buying new wood would have been, but the effect is not unpleasant, the wood was free, and it’s nice to find a use for some century-old seafaring wood that would otherwise have been scrapped.
The new cherrywood arch that divides the main salon from the bunk forward of the mast is rather more ponderous than the original fir was, and having got the wrong sort of stain, is rather darker than I’d intended, but it does a good job of defining the break in the cabin, and is a definite improvement over the separating wood that it replaced. There’s still some complex trim to finish up in that area, with each piece waiting on the one before, and that one waiting on a plan, but it’s all part of the method. If you follow the method, everything will be done at last—or so I’m told.